
You are currently browsing the category archive for the ‘recipes’ category.
The mister and I have rather slovenly spent the entire day in our PJs making shit.
He made this:

Yummy coffee cake. I’ve not tried it yet (well, I had a wee bit of the stuff that stuck to the sides of the pan), but it looks and smells incredible.
I’ve been working on this:

That’s a big puddle ‘o quilt I’m working on for a wee button due to shuffle onto this spinning rock sometime next month. I kind of love quilting. My way of quilting anyway. The way a colour story comes together and can be screwed with is my kind of fun.
In between quilty things, I made challah, using this recipe.
A few words about the recipe:
- I often cook breads on the top rack of the oven with a pan of water on the lower rack. This caused the cook time to be much longer than what is cited in the recipe.
- The recipe makes 4 x 1 pound loaves. I did a plaited loaf + gynormous rolls. This also upped the cook time considerably.
- I used silicon muffin ‘tins’ for the rolls & a cooking stone for the loaf. If you do not have these things, go get some now. They will revolutionize the way you bake.
This stuff is easy peasy, lemon squeezy. No kneading required, just a little time to let it rise a couple of times. Soooo delicious. 2 of the humongous rolls from the batch disappeared within about 30 seconds. So good:

I also did a proper braid:

Well, maybe not proper. There are only 3 strands in the plait as opposed to the usual 6ish. Next time I’ll do a 6-strand plait.
So yeah, in the end: totally gratifying recipe.

I’m normally an anti-bouillon, build it from scratch, chicken soup girl. I really hate the either too salty or no flavour qualities bouillon brings to the table so hardly a carcass, asparagus end, mushroom stem or handful of wilted parsley crosses my path without being tossed in a bag and frozen for future use in homemade soup stock. One day I will get around to documenting my process for creating homemade soup stock but today is not that day. Last night, out of a lack of time & energy & the need to provide the eldest sprog with the nasty bottom sustenance in somewhat liquid form, I caved and made a not-from-scratch chicken soup. It gave me an opportunity to get rid of some rice leftovers and to test drive a product I’ve only recently discovered. It was the quickest, easiest chicken soup I’ve ever made & it was pretty damned good so I’ll share that recipe with you instead.
What you need:
1 tablespoon of olive oil
A good pinch of black pepper
1 large cooking onion
2 inch chunk of ginger, peeled
4 cloves of garlic
6 bay leaves
6 cloves*
A healthy pinch of ground nutmeg
8 boneless, skinless chicken thighs**
2 (UK) quarts of water (10 cups)
2 cups of pre-cooked rice
1 and 1/2 tablespoons of Better Than Bouillon(tm)***
3 cups of vegetables of your choice (I used a frozen mix of carrots, broccoli & cauliflower)
6 sprigs of fresh thyme or 1 tablespoon dried
I started with heating the olive oil in my large stock pot over medium-high heat and because I was concerned with getting the oniony/garlicky flavours into the soup quickly I puréed them together before adding them to the pot. I should have added the ginger to that mess as I neglected to tell my family that there were large chunks of it they may not want to consume and I think everyone but me got one. Good times. So, then I added the onions, garlic, ginger, cloves, nutmeg & bay leaves to the pot and cooked until everything was a lovely, translucent slop. I then added the thighs and cooked those until lightly browned. At this point they were easy to pull apart into bite-sized pieces in the pot with a couple of wooden spoons so I did that. Then in went the water, the bouillon-esque stuff and the rice. I brought all of that to a boil then added the frozen vegetables & thyme sprigs & let the lot of it simmer until the vegetables were tender.
*The French word for cloves is clous which translates back to english as nails. I don’t know why I like that so much but it always makes me think of making orange/clove pomanders as a kid at Christmas time.
**Why thighs? The slightly higher fat content lends itself to better flavour distribution as well as holding its own against other flavours & being easy to pull apart once cooked.
**This stuff is like magic. The instructions on the jar called for 1 and 1/2 tablespoon per quart of water used but I got away with 1 and 1/2 for the entire batch of soup. It wasn’t too salty (the stuff is worth about 39% of your daily sodium intake recommendations per 6 gram serving which, compared to others with 45% for 3.5 grams is pretty decent) and my chicken soup tasted chickeny and not bouillony.
I don’t know about any of you but I’m still sat here in my pyjamas, sipping a manhattan and brimming with smugness for having done almost nothing productive today. I did do laundry, but I was still on auto-pilot so it hasn’t registered in the productivity scale.
The weekend was highlighted by a crash visit from my Megan who was going stir-crazy in her rural digs and so hitch-hiked in for some mindless entertainment chez nous. After a brief lecture directed at my loin fruits about the perils of hitch-hiking we most definitely came through on the mindless entertainment part & much wine, food, guitar hero and general joyful conviviality was had by all (except the wine bit for the sprogs – I made them chai and shiley temples).
Today the son indulged us with his waffle-making skills & I created a lovely apple stew to go with them. Perfect for a lazy Sunday 14:00h brunch.

I can’t share the buttermilk waffle recipe as that’s the son’s secret, but here’s how to make the stew:
What you need:
7 apples
1/2 stick of butter
2 cardamom pods lightly crushed
4 cloves
2 tsp ground cinnamon
1/5 cups sweet vermouth
10 dashes of Angostura bitters
Peel and roughly chop the apples into bite-sized bits. In a medium sauce pan melt the butter then add the spices and the apples. Cook and stir until the apples become somewhat fork tender. Add the vermouth and cook and stir over low heat until it thickens. Try to time this with the finish time of the waffles. If you miss just add a little more vermouth to loosen it up again. Serve over hot waffles & vanilla ice cream and top the lot of it with loads of freshly ground pepper.
I hope you all had as lovely a weekend.

That’s last night’s pantry-busting-inspired experiment.
I took some pre-made naan from the freezer, sauced it up with a 1:1 mix of tikka sauce and sour cream (yoghurt could be substituted), added some roasted snow peas, spinach, peppers and broccoli, then some bits of cooked chicken – all topped off with grated marble cheese. Tossed them on the pizza stones in a 400 degree oven for about 10 minutes and out they came all gooey and golden and pizza-esque.
Next time I’ll use goat cheese but otherwise wouldn’t change a thing.

So tonight it was experimental squash canelloni for supper. This baby’s not going to win any beauty contests any time soon. I was going to cook a nice, innocuous tenderloin but forgot to take it out of the freezer so here we are. Plus, there were squash guts leftover from the lovely soup the mister the other night so this is all in the name of using what I’ve got. I was determined to use only things we had on hand for this dish. I almost did it but had to run across to the convenience store across the street and buy a can of tomatoes. It was very tasty but the texture was lacking…something. Everything was just too the same. I know that’s par for the canelloni course and maybe it’s my palette which is picky but I have a few thoughts on making a new, improved version. Beyond that I was really happy with the milk sauce I chose to go with it. It has been ages since I’ve had a milk pasta dish and this one really served its purpose in balancing flavours; it wasn’t so hearty that it overpowered the squash and wasn’t so meek that it needed a lot of help holding itself up.
Here’s the skinny on the filling:
2 cups of mashed, cooked squash
3/4 cup feta cheese, crumbled
1 red onion, minced
1/4 cup pesto
Mix everything together and stuff into canelloni noodles laying out them in one layer across the bottom of an 11×13 casserole dish as you go. I used oven-ready in the interest of time and because I hate working with the cooked ones. This recipe uses about one box.
The sauce:
2 cups tomato sauce of your choice
2 cups of milk
1/4 cup pesto
Mix all of that together then use it to completely cover the stuffed canellonis in the casserole dish. Bake at 350 degrees for 15 minutes then top with slices of provolone, mozzarella or havarti and cook for another 30 minutes or until the noodles are tender.
So I would totally make this again but, instead of making a squishy squash filling I would transfer a lot of the flavour elements, like the feta and more pesto, to the sauce and use uncooked squash spears inside the noodles. This would eleminate a lot of the mess involved in stuffing them and help give the dish a little more textural backbone.
We have a lovely organic poultry vendor at our local farmer’s market from whom I (and the rest) get tremendously good deals on his capons (2 for $40 – can’t beat that) so I’ve usually got a couple in the freezer at any given time. I was feeling like we needed a toasty, warm, autumnal meal this weekend so here’s what I made:
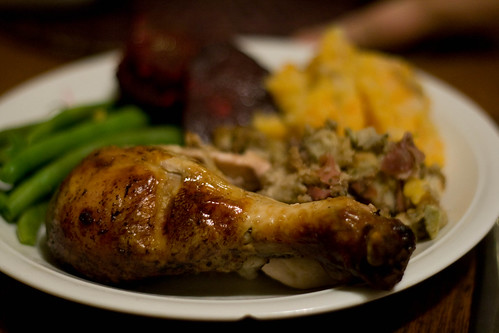
I tend to prefer dryer bread for stuffing than the fresh sesame bread I ended up using just because it keeps it from getting soggy. To it I added 2 diced macintosh apples, which are about two weeks out of season here and are getting a little softer as a result. This makes them perfect for cooking in this manner and add a little moisture to the stuffing. I also tossed in some chopped proscuitto, ground sage (can’t WAIT until the stuff my Megan provided is ready for rubbing), ground nutmeg, oregano and lemon juice. Capons don’t need a lot of help in the flavour, fat or moisture department so I wanted a lot of that to come infused through the stuffing, rather than treating the meat itself but I did pour the better parts of the remnants of a bottle of white zinfandel from last night’s wine night (donated by a well-meaning guest rather tragically to a group of red snobs) into the pan to help it out a little. The results were great. The proscuitto gave it a low smokey flavour, the sage came through in a subtle tone, that apples lent their juices to getting everyone to make friends and the lemon juice and wine perked things up nicely. We ate our chicken and stuffing with mashed potatoes and yams, fresh green beans, & beats in horseradish butter. It was lovely.
Yesterday was our first snow up and over here in the borough. It snowed big white, wet snow fluff from about 10 in the morning until 6 at night. It snowed enough that it collected on the ground in spite of the plus zero temperatures but was mostly melted by morning. Living on the main drag I’ve seen cars coming through with a good 2-3 inch covering of the white stuff still on them today.
Although there are many things I love about winter I don’t feel prepared or equipped with the skills to deal with it and all that it implies just yet. I still have lavendar to harvest, a rosemary plant to pot up and winter coats to buy for the kids. I have zippers to replace and orders to fill and the early onset (17 days earlier than last year) makes me feel more frantically behind than I did the day before it snowed.
The dog hated it too. I’m sure if his first introduction to snow was a lighter, shiner, less wet and blustery one he would have been ok. I tried to take him to the park and let him off the leash so he could tear around the basketball pad as he loves to do but he just stood there and looked at me scornfully.
Yesterday was miserable so I treated myself to this:
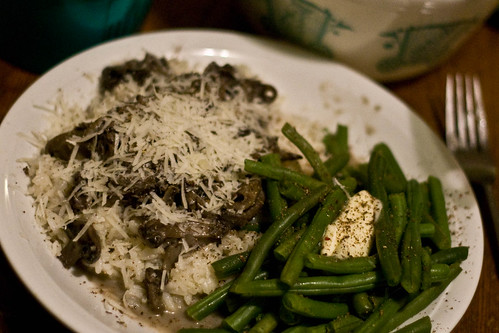
A variation on this dish, sans polenta. The kids protest when I make them eat placenta polenta. The mushroom guy at the market had loads of oyster mushrooms last weekend and proclaimed his undying love for me when I bought two lots of them as well as my usual stock of creminis. I cheated and nuked the arborio rice rather than making it a true risotto in the name of timing and not burning the rice. I even let us eat in the living room, curled up under blankets, watching the first episode of True Blood (the kids fast forwarded through all the sex scenes I’d forgotten were in it) me with my glass of wine. It was lovely.

This is probably the easiest meal we put together in our kitchen on a fairly regular basis. Its roots are found in the CPHA‘s publication, The Basic Shelf Cookbook, which is something I feel every household should have a copy of. I don’t actually own the book right now (and before you call me a hypocrite you should know that I’ve owned the book and given it away at least 7 times.) The contents are brilliant on a fundamental level: simple meals comprised largely of ingredients with long shelf lives which focus on maintaining nutritional integrity. It can be ordered here for CDN $7.50.
My recipe differs from the original by a couple of steps and ingredients but still maintains the inherent simplicity while stepping up the flavour quotient a couple of notches. Oh, and it’s entirely vegan if you omit the cheese or replace it with a soy based cheese.
What you need:
1tbsp olive oil
1 tsp. coriander, ground
1 tsp. cumin, ground
1 medium sized cooking onion, finely chopped (vidalias and reds are my favourites for this soup)
4 cloves of garlic, crushed
2 cans of diced tomatoes (or jars if you do your own)
1 can of black beans (or soak the dried kind if you want to)
1 can of sweet or baby corn (or use leftovers if you’ve got ’em)
2 cups of vegetable broth (or dissolve 2 cubes/packets of bouillon-esque stuff in your 2 cups of boiling water)
1 tbsp dried or 1/4 cup fresh oregano
1 tbsp dried or 1/4 cup fresh basil
A pretty, fresh herb and some cheese for garnish (I’ve got cilantro and cheddar in the pic above but parsley &/or basil are great alternatives to the cilantro if you don’t have any on hand.
Toast the spices in a large pot over medium-high heat until fragrant. Turn the heat down to medium-low and add the tablespoon of olive oil. Once the oil is hot, sweat the onions and garlic in it for 3-4 minutes or until translucent. Add the tomatoes, corn, beans & stock. Up the heat again to medium-high and keep it there, stirring constantly, until the mixture reaches a low boil. Stir in the herbs. Move to large bowls and garnish.
No picture of this as I haven’t had the opportunity to do the frozen versus fresh trial I wanted to as ‘plain yoghurt’ means ‘vanilla-flavoured yoghurt’ in the minds and hearts of my yoghurt buyers. I shall post my recipe for the wonderful nibblies things anyway.
The dough recipe I use comes out of a cookbook called Peterborough Peoples’ Potluck Picks. This amazingly alliterative oeuvre was purchased through a local fundraiser for Canadian Crossroads International back in 1993 and contains simply the tastiest & most forgiving, recipe for samosa dough ever.
What you need for the dough:
2 cups all-purpose flour
1 tsp. salt
2 tbsp. butter, margarine or ghee
3/4 cup plain (not vanilla) yoghurt (I prefer balkan style for this but anything from fat-free to homemade will work)
Lightly mix the flour and salt in a large bowl then cut in the butter/margarine with a fork or a pastry cutter until the mixture looks all coarse like breadcrumbs. Stir in the yoghurt then mix it all together with your hands. Dough hooks and other gadgets really don’t work well with this dough as part of the pliability of it leans on body heat – avoiding getting your hands dirty will not result in a good dough. You don’t need to knead it, just mix with the hands forming it into a ball as you go. Once that’s done you can set it in the fridge while preparing the samosa guts.
What you need for the innards:
1/2 cup of chopped onion – I like sweet & nutty flavour of vidalias for samosas
3 cloves chopped garlic
3 large potatoes diced – I prefer reds as they wash up quickly and the skins can be left on but usually use 4-5 of these as they don’t really come in large size russets (which is an effective alternative) or other white-skinned varieties do around here
1 cup of fresh or frozen peas – alternatively, that frozen vegie mix comprised of carrots, peas, corn & beans works really well too and allows me to get samosas past people who say they don’t like peas
2 tbsp. margarine, butter or ghee
juice of 2 limes
salt to taste
spices (I’ll get into that in a bit)
Heat a skillet over medium-high heat then melt the butter/margarine/ghee in it. Add the onions, garlic, potatoes and salt and allow everything to brown just a bit. Once slightly browned, reduce the heat to low-medium and continue to cook until the potatoes are fork tender (about ten minutes.) Up the heat to high, add the salt and peas and cook over high heat for another 2-3 minutes. Then it’s time to remove the filling from the heat source and talk about spices.
As you’ve probably been able to deduce, samomas are pretty versatile creatures. As such, there are infinite possibilities for dealing with their spiciness. One could create their own amalgam of spices, toss in a pre-made garam masala or curry paste or keep them minimal and somewhat pirogie-like. If I’m feeling lazy I’ll toss in 1 tbsp of Sybil’s Jerk Seasoning or her Kick Ass Curry Paste (I’m sorry for those of you who don’t live in the area and don’t have access to her wonderfully spicey bounty of deliciousness) but I almost never use a pre-fab curry powder. So when I’m feeling less lazy I mix up a concoction of equal parts cumin, coriander, allspice, nutmeg, tumeric & ground chilies…which I often have on hand as I also almost always make up too much of this concoction. This can all be ground together in a coffee grinder, small food processor or with a mortar & pestle. The important part is to season your filling to taste and mix it well. After that’s done the lime juice can be added and mixed in as well.
The filling should be allowed to chill at least an hour or two before using it with the dough otherwise it could make the samosas fall apart. When you’re ready to fill them, get out the ball of dough and divide it in half, then divide those in half again and so on until you’ve got 32 little balls. Then just roll those little balls out into circles as thinly as you can, add about 2 tbsp of filling, fold the dough over the filling and press the dough edges together with a fork. I always need to experiment with the first couple I make. The beauty of this dough is that it’s very stretchy, the downside to that is that I end up overestimating it’s stretchiness. I’m an overstuffer. Some people are understuffers, and the downside to that is you end up with really doughy samosas.
I like to get at least one other person in on the rolling and stuffing part of the samosa-making process. This allows me to get them cooking as we go which prevents them from sitting and sweating on a surface which doesn’t allow them to breathe and making them more breakable. That generally plays out as me being in charge of the hot oil for deep frying, 1 kid rolling and 1 kid stuffing. If I don’t have an extra set of hands around to help me out I can get around the sweat issue by preheating the oven to 425 degrees, moving the stuffed samosas directly to a lightly greased baking sheet then moving the full-of-stuffed-samosas baking sheets directly to the oven to cook for about 5 minutes (just long enough to dry the dough, but not to brown it) then moving the samosas onto cooling racks. The advantage of going that route rather than directly to deep fry is that they’re easier to store as they can be tossed into freezer bags and then into the freezer then brought out and deep fried at a later date. One could also finish them in the oven and bypass deep frying altogether, but let’s face it, part of the appeal is the crispy, goldenness of these tasty treats.
So there you go. It’s not a complicated process but it definitely can be a long one. I like to justify it by making a double or triple batch so there are some to enjoy immediately and others to be put away for entertaining later.

Someone suggested having a crepe-themed wine (or ‘let’s eat ’til we burst’) night with our regular motley crew and Friday that plan finally came together. They’re really not the mystery one might have you believe them to be and they make for a nice, decadent, incredibly versatile treat once every 5 years or so. You may as well try to make them.
What you need for savoury crepes:
2 large eggs
3/4 cup milk
1/2 cup water
1 cup flour
1/4 cup melted butter
1/2teaspoon salt
1/4 cup chopped fresh parsley
What you need for dessert crepes:
2 large eggs
3/4 cup milk
1/2 cup water 1 cup flour
1/2 teaspoon salt
1/4 cup melted butter
2 tablespoons sugar
1 teaspoon vanilla extract
2 tablespoons of amaretto
Butter or cooking spray (which I don’t normally endorse the use of but I’ve score a lifetime supply of it and need to use it for something) for greasing the pan(s).
In the bowl of a large (10-12 cup) food processor mix together all of the ingredients (except the butter or cooking spray for the pan) and pulse together 10 times for 2 seconds each. If you feel the need for more batter just double the batches but mix them separately for a smoother batter. That’s it, that’s all. Well, until you’re ready to cook them and you won’t be for a good hour or so as it’s best to refrigerate the batter for at least an hour to quell the bubbles which cause crepe breakage during and after cooking. I also like to allow the batter to sit at room temperature for a good 15 minutes before cooking as it helps the butter get back in with the rest of the batter family after it’s resolidification time in the frigo.
As far as cooking crepes goes I tend to prefer a heavy bottomed skillet over the thin, low lipped crepe pans. the reason for this is that I can get a good flip out of a larger pan and can control the heat in them better. The good flip means less handling which means less breakage which makes for happy crepes. The temperature control means less burning which means I can have two pans on the go at once without compromising the integrity of the crepes. So 2 heavy skillets over medium high heat with a wee bit of butter rubbed on them or cooking spray sprayed in them for lube will get you going – just remember to start them one at a time and if you don’t feel like doing two at a time, don’t.
It always takes me at least three crepes to gage how much batter to use when experimenting with new equipment (and I was as I wasn’t at home.) I eyeball how much goes in; I start with about a quarter of a cup of batter in the pan and swirl it around until the bottom is lightly coated in batter. If my crepe is not translucent enough to see the bottom of the pan I know I’ve got too much batter. If there are holes through the crepe I know I’ve got too little. I adjust accordingly either way with subsequent crepes until I get it right.
Crepes can be filled with just about anything. Friday night we had each guest bring a selection of fillings for both sweet and savoury crepes so our selection consisted of roasted chicken breasts, asparagus, sauteed mushrooms and spinach, cheese curds, old cheddar cheese, butter chicken sauce, mushroom wine sauce, bechamel, prosciutto, tomato butter, shrimp & potatoes. For the dessert crepes (sorry;no pictures of those – I blame the wine) we saw amaretto cream cheese whipped cream, amaretto stewed fruits (do you sense a theme here?) raspberry compote, fresh strawberries and blackberries, and probably a bunch of other stuff I can’t remember. It was all wonderfully yummy and incredibly filling but kept up with the wine nicely.
