
You are currently browsing the tag archive for the ‘recipe’ tag.

That’s last night’s pantry-busting-inspired experiment.
I took some pre-made naan from the freezer, sauced it up with a 1:1 mix of tikka sauce and sour cream (yoghurt could be substituted), added some roasted snow peas, spinach, peppers and broccoli, then some bits of cooked chicken – all topped off with grated marble cheese. Tossed them on the pizza stones in a 400 degree oven for about 10 minutes and out they came all gooey and golden and pizza-esque.
Next time I’ll use goat cheese but otherwise wouldn’t change a thing.

So tonight it was experimental squash canelloni for supper. This baby’s not going to win any beauty contests any time soon. I was going to cook a nice, innocuous tenderloin but forgot to take it out of the freezer so here we are. Plus, there were squash guts leftover from the lovely soup the mister the other night so this is all in the name of using what I’ve got. I was determined to use only things we had on hand for this dish. I almost did it but had to run across to the convenience store across the street and buy a can of tomatoes. It was very tasty but the texture was lacking…something. Everything was just too the same. I know that’s par for the canelloni course and maybe it’s my palette which is picky but I have a few thoughts on making a new, improved version. Beyond that I was really happy with the milk sauce I chose to go with it. It has been ages since I’ve had a milk pasta dish and this one really served its purpose in balancing flavours; it wasn’t so hearty that it overpowered the squash and wasn’t so meek that it needed a lot of help holding itself up.
Here’s the skinny on the filling:
2 cups of mashed, cooked squash
3/4 cup feta cheese, crumbled
1 red onion, minced
1/4 cup pesto
Mix everything together and stuff into canelloni noodles laying out them in one layer across the bottom of an 11×13 casserole dish as you go. I used oven-ready in the interest of time and because I hate working with the cooked ones. This recipe uses about one box.
The sauce:
2 cups tomato sauce of your choice
2 cups of milk
1/4 cup pesto
Mix all of that together then use it to completely cover the stuffed canellonis in the casserole dish. Bake at 350 degrees for 15 minutes then top with slices of provolone, mozzarella or havarti and cook for another 30 minutes or until the noodles are tender.
So I would totally make this again but, instead of making a squishy squash filling I would transfer a lot of the flavour elements, like the feta and more pesto, to the sauce and use uncooked squash spears inside the noodles. This would eleminate a lot of the mess involved in stuffing them and help give the dish a little more textural backbone.
Yesterday was our first snow up and over here in the borough. It snowed big white, wet snow fluff from about 10 in the morning until 6 at night. It snowed enough that it collected on the ground in spite of the plus zero temperatures but was mostly melted by morning. Living on the main drag I’ve seen cars coming through with a good 2-3 inch covering of the white stuff still on them today.
Although there are many things I love about winter I don’t feel prepared or equipped with the skills to deal with it and all that it implies just yet. I still have lavendar to harvest, a rosemary plant to pot up and winter coats to buy for the kids. I have zippers to replace and orders to fill and the early onset (17 days earlier than last year) makes me feel more frantically behind than I did the day before it snowed.
The dog hated it too. I’m sure if his first introduction to snow was a lighter, shiner, less wet and blustery one he would have been ok. I tried to take him to the park and let him off the leash so he could tear around the basketball pad as he loves to do but he just stood there and looked at me scornfully.
Yesterday was miserable so I treated myself to this:
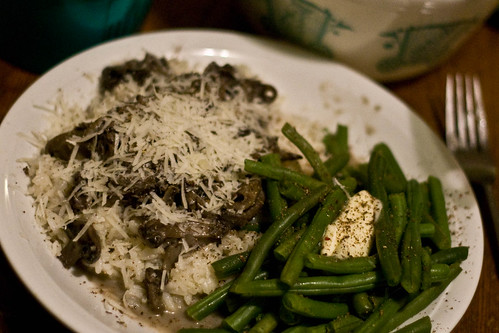
A variation on this dish, sans polenta. The kids protest when I make them eat placenta polenta. The mushroom guy at the market had loads of oyster mushrooms last weekend and proclaimed his undying love for me when I bought two lots of them as well as my usual stock of creminis. I cheated and nuked the arborio rice rather than making it a true risotto in the name of timing and not burning the rice. I even let us eat in the living room, curled up under blankets, watching the first episode of True Blood (the kids fast forwarded through all the sex scenes I’d forgotten were in it) me with my glass of wine. It was lovely.
No picture of this as I haven’t had the opportunity to do the frozen versus fresh trial I wanted to as ‘plain yoghurt’ means ‘vanilla-flavoured yoghurt’ in the minds and hearts of my yoghurt buyers. I shall post my recipe for the wonderful nibblies things anyway.
The dough recipe I use comes out of a cookbook called Peterborough Peoples’ Potluck Picks. This amazingly alliterative oeuvre was purchased through a local fundraiser for Canadian Crossroads International back in 1993 and contains simply the tastiest & most forgiving, recipe for samosa dough ever.
What you need for the dough:
2 cups all-purpose flour
1 tsp. salt
2 tbsp. butter, margarine or ghee
3/4 cup plain (not vanilla) yoghurt (I prefer balkan style for this but anything from fat-free to homemade will work)
Lightly mix the flour and salt in a large bowl then cut in the butter/margarine with a fork or a pastry cutter until the mixture looks all coarse like breadcrumbs. Stir in the yoghurt then mix it all together with your hands. Dough hooks and other gadgets really don’t work well with this dough as part of the pliability of it leans on body heat – avoiding getting your hands dirty will not result in a good dough. You don’t need to knead it, just mix with the hands forming it into a ball as you go. Once that’s done you can set it in the fridge while preparing the samosa guts.
What you need for the innards:
1/2 cup of chopped onion – I like sweet & nutty flavour of vidalias for samosas
3 cloves chopped garlic
3 large potatoes diced – I prefer reds as they wash up quickly and the skins can be left on but usually use 4-5 of these as they don’t really come in large size russets (which is an effective alternative) or other white-skinned varieties do around here
1 cup of fresh or frozen peas – alternatively, that frozen vegie mix comprised of carrots, peas, corn & beans works really well too and allows me to get samosas past people who say they don’t like peas
2 tbsp. margarine, butter or ghee
juice of 2 limes
salt to taste
spices (I’ll get into that in a bit)
Heat a skillet over medium-high heat then melt the butter/margarine/ghee in it. Add the onions, garlic, potatoes and salt and allow everything to brown just a bit. Once slightly browned, reduce the heat to low-medium and continue to cook until the potatoes are fork tender (about ten minutes.) Up the heat to high, add the salt and peas and cook over high heat for another 2-3 minutes. Then it’s time to remove the filling from the heat source and talk about spices.
As you’ve probably been able to deduce, samomas are pretty versatile creatures. As such, there are infinite possibilities for dealing with their spiciness. One could create their own amalgam of spices, toss in a pre-made garam masala or curry paste or keep them minimal and somewhat pirogie-like. If I’m feeling lazy I’ll toss in 1 tbsp of Sybil’s Jerk Seasoning or her Kick Ass Curry Paste (I’m sorry for those of you who don’t live in the area and don’t have access to her wonderfully spicey bounty of deliciousness) but I almost never use a pre-fab curry powder. So when I’m feeling less lazy I mix up a concoction of equal parts cumin, coriander, allspice, nutmeg, tumeric & ground chilies…which I often have on hand as I also almost always make up too much of this concoction. This can all be ground together in a coffee grinder, small food processor or with a mortar & pestle. The important part is to season your filling to taste and mix it well. After that’s done the lime juice can be added and mixed in as well.
The filling should be allowed to chill at least an hour or two before using it with the dough otherwise it could make the samosas fall apart. When you’re ready to fill them, get out the ball of dough and divide it in half, then divide those in half again and so on until you’ve got 32 little balls. Then just roll those little balls out into circles as thinly as you can, add about 2 tbsp of filling, fold the dough over the filling and press the dough edges together with a fork. I always need to experiment with the first couple I make. The beauty of this dough is that it’s very stretchy, the downside to that is that I end up overestimating it’s stretchiness. I’m an overstuffer. Some people are understuffers, and the downside to that is you end up with really doughy samosas.
I like to get at least one other person in on the rolling and stuffing part of the samosa-making process. This allows me to get them cooking as we go which prevents them from sitting and sweating on a surface which doesn’t allow them to breathe and making them more breakable. That generally plays out as me being in charge of the hot oil for deep frying, 1 kid rolling and 1 kid stuffing. If I don’t have an extra set of hands around to help me out I can get around the sweat issue by preheating the oven to 425 degrees, moving the stuffed samosas directly to a lightly greased baking sheet then moving the full-of-stuffed-samosas baking sheets directly to the oven to cook for about 5 minutes (just long enough to dry the dough, but not to brown it) then moving the samosas onto cooling racks. The advantage of going that route rather than directly to deep fry is that they’re easier to store as they can be tossed into freezer bags and then into the freezer then brought out and deep fried at a later date. One could also finish them in the oven and bypass deep frying altogether, but let’s face it, part of the appeal is the crispy, goldenness of these tasty treats.
So there you go. It’s not a complicated process but it definitely can be a long one. I like to justify it by making a double or triple batch so there are some to enjoy immediately and others to be put away for entertaining later.
If you’re as much of a pasta fiend as I am (and I know you are) then you’ve probably discovered the merits of fresh pasta over the dried stuff we can buy in cello bags at any grocer’s. Not that there’s anything wrong with the dried stuff; it’s easy, convenient and generally pretty tasty stuff…but it just doesn’t compare to the fresh stuff. Making pasta isn’t difficult but I won’t lie; it is time-consuming. I wish I was as quick with the stuff as Zia Louisa who thought nothing of whipping up a batch for unexpected guests…but I’m not, so it becomes a bit of a project…but oh-so-worthwhile.
What you need for four good-sized servings:
1 cup all purpose flour
2/3 cup fine durum semolina (we’ve talked about this stuff before)
2 eggs
1 tbsp. olive oil
1 tsp salt
2-3 tbsp. warm water
Take all of the dry ingredients and blend them in a large bowl.

Once blended the dry stuff needs to have a well made in the centre. I failed at getting a good pic of that but it’s basically like making a bowl within the bowl. Into that inner bowl the wet ingredients are put. Like so:

At this point the inner bowl is folder over onto the wet ingredients.

I’m a big fan of the wooden spoon for that part. It can be done with the hands, but hands aren’t quite as good at getting underneath everything and pulling the stuff from the bottom up to the top. Once the wet ingredients are completely covered in the dry it’s time to stir…and stir and stir and stir until the contents of the bowl look like this:

Now it’s time to get the hands in there. And it’s important to use hands now because they will be the gauge for how moist the dough is. If it’s not sticking together then we’ll want to add more water, 1 tablespoon at a time, until it does. If it’s too sticky then we’ll want to add more flour, one tablespoon at a time. The result should be a wee bit sticky, leaving a thin film on the hand but firm too. When worked into a ball it should look a little like this:

Once it’s there, remove the ball from the bowl and work it into a rough log, then cut the log into 1 inch thick rounds.

Now the pasta is ready for rolling. I have a handy dandy pasta roller and cutter. It’s a dream.

And it’s pretty dirty so I shall sacrifice one of those 1 inch rounds of dough to help get it clean. In pressing the dough and pulling it along the rollers and the cutters all of the grub gets pulled out without compromising the integrity of the machine. Washing it is pretty much out of the question as it may rust those moving bits which do all the dirty work. I always save the end pieces of my dough logs for this job; one for the beginning of the process and one to give it a go over at the end.

Once satisfied with the cleanliness of one’s machine, the pressing of the real stuff may begin. Before beginning that, it’s important to flour the surface the pasta will be spending time on in between pressings. Most pasta machines start with the thickest pressing at number 1 (as does mine) but whatever the number, we want the first pressing to be at the thickest the rollers will allow then get thinner incrementally with each pressing.
Here’s the dough after the first press:

The end product should determine how thin the dough gets pressed but it’s important to get it thinner incrementally or the dough will tear. I usually cheat and go from 1 to 3 then up to 6 then 7 for things like ravioli or 9 (which is the thinnest setting on my machine) for things like spaghettini.
It’s best to move onto the cutting stage just before you’re ready to cook the pasta as this stuff doesn’t really store well (unless you’ve got a proper drying rack…which still doesn’t work for things like ravioli.) I swear by the biggest pot in the house for cooking pasta…doesn’t matter how much I’m cooking. The more space the noodles have to roll around in the boiling water the less chance they have of sticking together or requiring oil (we’ve talked about that before too) after they’re cooked. So I fill that big pot to within 2 inches of the top add a little salt and no pasta whatsoever until it’s at a rolling boil. But we’ll talk a bit more about that tomorrow.
It really is fast -I’ve been known to put this together in under 10 minutes upon realising kids needed to be at scouts, soccer, whatever within the hour…but hopefully it’s dirty only in the figurative sense.
What you need:
1 box oven-ready lasagne noodles
2 cans of diced tomatoes
3/4 cup of pesto (or about 4 cubes)
1 tub of cottage cheese
2 cups shredded mozzarella cheese
1 egg
An assortment of fresh vegetables from your fridge. In batch I used 1 large red pepper, 1 large yellow pepper, 1 medium zucchinis, half a pound of asparagus, 4 portablello mushrooms all sliced.
First step is to drain the tomatoes in a colander.

Transfer that to a bowl and add the pesto.

I know, it looks gross…it’s not going to look pretty any time soon, but it will taste fantastic. IN another bowl mix the egg and the cottage cheese together. The egg will help to bind the egg and keep your lasagne from being too runny.

Then it’s time to start layering in the pan. I start with a good, thick layer of the tomato/pesto mixture.

Yup. Still gross.
On top of that I add one of the vegetables, starting with the peppers this time.

Over that we put a single layer of the oven-ready noodles.

It doesn’t even need to be even. That’s a 10×14″ pan. Over that we add some of the cottage cheese mixture, another vegie (asparagus this time…in case you can’t tell), then more noodles.

And so on…

And so forth, alternating sauce, vegies, noodles until we’re out of all of the above.

Oven-ready noodles don’t hold up too well to being the directly-under-the-mozza layer so I always finish off with a vegetable (or fungus, as it were). On top of that I sprinkly my mounds of mozzarella and then toss the lot into the oven for 45 minutes at 375 degrees.

And end up with a nice, non-runny, not-as-gross-looking vegetable lasagne.
Lazy Sundays at our house tend to lead to one of my favourite lazy Sunday breakfasts: grilled steak, fresh cornbread and pico di gallo. Today I’m making the cornbread and pico di gallo bits to take to a potluck we’re attending this evening, so it’s a good time to share lazy Sunday recipes as it’s an industrious Saturday and I’m not pre-occupied with spending as much time in my pyjamas, exerting as little energy as humanly possible.
I tend to like my cornbread more on the dense and crispy and yellow side than on the light and fluffy side as it holds up better to the various abuses I will inflict upon it in the interest of making it OTT yummy. This, however, is counter-intuitive to the cornmeal’s efforts toward self-actualisation; it’s very much its own leavening agent so sometimes I add a little extra butter to keep that cornmeal down. Though the verdict’s out on whether proper cornbread should be sweetened or purely savoury, I’m in favour of adding sugar to mine for the same reason I like it dense and crispy – it holds up better to whatever I put with and in it. Here’s the basic recipe:
Ingredients
1 cup yellow cornmeal
1 cup flour
1/4 cup granulated sugar
1 tbsp baking powder
1 tsp salt
1/4 cup melted butter
2 eggs
1 cup milk or buttermilk
Instructions
Preheat oven to 350 degrees. In a large bowl mix the dry ingredients. In another mix the wet ones. Stir the wet ones into the dry ones until they’re all coated in each other. Toss the lot in a greased 8×8 baking dish. Bake for about 25 minutes or until the edges are golden brown. Easy peasy.
Variations
This is the fun part of cornbread. To today’s batch I added 1 and a half cups of grated old cheddar cheese and about 2 tablespoons of roughly chopped chipotles to the bread. Other yummy additions could be dill and lemon peel, chopped jalepenos, onions, red or green peppers…the list goes on. This stuff’s great because it’s so easily adapted to whatever you’re serving with it. It can quickly become a one-dish, vegetarian meal by thinning the batter over a larger surface and topping it with seasoned tofu, beans and oven-worthy vegies like mushrooms, peppers, zucchinis, etc…Or one could simply add taco seasoning, if one believed in that sort of thing.
mmmMMMmmmm…cornbread:

Alright, I promise that my next post will be more atkins-friendly.
By popular demand (or frustration, as the case may be) this will not be a recipe as much as it is a tutorial. I’ve shared this recipe with many people only to have them come back at me, after attempting it, with ‘IT DOESN’T WORK!!!’ which always has me scratching my head because it really does just work.
After pondering it for a while I’ve come to the conclusion that folks are a little intimidated by things which involve leavening agents and the fomentation process – I know I am. The temptation is to work it into the ground and that’s the only way one can go wrong with this recipe.
I believe I made my first (failed) attempt at focaccia about 10 years ago through the discovery of a recipe for it in grilled form in an LCBO Food & Drink magazine. It came off the bbq as a charred-bottomed lump of…something. I attempted the same recipe in the oven with better results but it came out with a very un-focaccia-like texture. No good that. So, I played with the ingredients and times and cooking methods until I came up with the recipe I share today:
Ingredients:
1 tbsp liquid honey
1 cup hot (but not boiling) water
2 tsp dry active yeast
2 cups all purpose flour
1/4 cup yellow corn meal
1 tsp salt
2 tbsp olive oil
Instructions:
1. In a large mixing bowl, dissolve the honey in the water then sprinkle the yeast on top of this and allow to stand about 10 minutes until foamy.
Foamy yeast looks like this:

2. Add the flour, cornmeal, salt and olive oil to the yeasty mixture.
3. Stir with a wooden spoon. I believe this is where most people go wrong. It’s important to not overwork the dough – there’s no kneading involved. The aim here is to simply get all of the ingredients together as a gooey (and it really should be gooey) mess. Like so:

As you can see, the dough is not uniform. It’s sticky and doesn’t hold together very well. That’s exactly how it should be.
4. With the spoon work the dough into a rough ball and pour a little olive oil into the bowl. Coat the ball in the oil by rolling it loosely in it. Cover with a tea towel and let stand in a warm place about 20 minutes or until doubled in size.
5. Lightly oil whatever baking surface you’ll use to cook it on (this one is on my extra-uber-special pizza stone – we’ll talk about him another time) and turn your ball out onto it. Loosely pat it down to a circle then use your fingers to poke little craters into it:

6. Add your topping. On this one I used a very simple blend of 3 cloves crushed garlic, 1 tbsp oregano, loads of cracked multi-coloured pepper and olive oil but you can take the topping anywhere your little hearts desire. Using the back of a soup spoon helps to push the topping around and into the craters. Preheat the oven to 375 degrees and allow the focaccia to rest as it heats up. Here’s what our delectable brain child looks like now:

7. Bake at 375 for 20 minutes or until the edges are golden brown.
Et voila! We have focaccia =)


Jambalaya has always been a bit of a mystery to me. Never having lived in Africa or Louisianna, my first experience with it was in a Toronto Cajun-style restaurant as a side dish. I later got to enjoy another, Canadianized version of it in its ‘red’ form, then watched Emeril Lagasse make it on TV. A local Cajun inspired restaurant serves the brown type as a side which is distinctly different than the version I tried at an international potluck…and so on and so forth.
Though I’ve never had it in either of its ‘true’ forms, I’ve always felt that I had a good feel for what jambalaya is all about and how to make it better than the specimens I’d been exposed to. So, as is wont to happen, I made several attempts at creating this mysterious dish, going by nose, until I made it what I want it to be. Luckily a friend’s father (who ended up in Canadia as a draft dodger from the deep south) happily assisted me in fine-tuning (not to be confused with ‘authenticating’) my bastardised version while cursing my name as an appropriatrix of his culture all the way.
Here is the recipe in its current manifestation. Don’t be intimidated by all of the writing, it actually goes together in about an hour but I tend to reserve it for lazy sundays or those evenings when I feel like parking myself in the kitchen with a book:
Ingredients:
1tsp. cumin seeds.
1tsp. coriander seeds.
2tbsp. olive oil.
1 large cooking onion.
1/2 bulb of crushed garlic, divided.
1lb. chorizo or andouille sausages (these are sometimes hard to come by in our small city so I often subsitute Italian sausages for them)
1/2 lb. mushrooms of your choice (I don’t recommend anything too fancy dancy as they’ll need to withstand some abuse of flavour.)
2 pints beer of your choice (lots of things will work in this instance but fruitier stuff is probably not a good match.)
3-4 chipotles.
1lb. uncooked shrimp of your choice.
2 cans of diced tomatoes.
2 roughly chopped red bell peppers.
1tbsp. Thyme leaves.
2tsp. Oregano leaves.
Instructions:
1. Heat a large pot over medium heat for about 5 minutes then toss in the crushed cumin and coriander. Continue to heat until your kitchen reeks of warmed spices. I gauge this by the day I was heating said spices and my brother-in-law came to the kitchen door but would not come in because of the stink…if your spices are smelly enough to drive family away that’s the time to add the olive oil.
2. Add the olive oil and about two seconds later add the onions and half of the garlic. Saute until translucent.
3. Add the sausage.
4. Pay attention. The next steps are not for the faint of heart. 2 pints of beer is sacrificed to the mighty jambalaya gods to bring good ju-ju to this dish. At this point you’ll need to cook the sausages over high heat until you get that brown stuff which sticks to the bottom of the pot. Keep it up high and add beer as needed to lift the brown stuff from the bottom of the pot – not too much at once, though. You want this to reduce to almost no liquid between beer additions. Continue heating and reducing and adding beer until the beer is gone.
5. Turn the heat down to medium and add the mushrooms and chipotles. Simmer about 5 minutes
6. Add the diced tomatoes.
7. Let simmer for at least 20 mins over med-high heat (or as long as you desire over a lower heat, adding water or more beer as your little heart desires – I’ve been known to let this brew over a lower heat and a few days; turning the heat off during sleepy times and starting it back up again in the morning – this leads to a distinctly different-tasting dish.)
8. Turn up the heat and bring to a boil Add herbs, peeled shrimps and the rest of the crushed garlic and allow to boil for 10 minutes.
I like to serve my jambalaya in a bowl over brown rice with a sprinkle of chopped, fresh cilantro. My jambalaya is one of the yummiest things I eat.
